


Idea: Color Photos with the Game Boy Camera
Note:I wrote this article in 2001. At the time, Nintendo had a camera add-on product for the Game Boy that took low-quality black and white pictures. Small, cheap, color digital cameras were not nearly as prevalent as they are now. I originally posted this on my photography website. There has been a link to the article from Ironic Sans in the sidebar on the front page, but I’ve decided to integrate it as a regular Ironic Sans entry and remove the sidebar link.
Background
All colors of the visible spectrum can be broken down into combinations of just three colors: Red, Green, and Blue. In fact, if you look at your computer screen under a magnifying glass, you will see that it is made up of tiny red, green, and blue lights that are varied in combinations to create all the colors you see on your screen.
Every color picture can be broken down into three separate black-and-white pictures which represent the amounts of red, green, and blue that are used to make up that picture, as in this example:

The Theory
If a color picture can be made from three black and white pictures, I could use the Game Boy Camera to take three separate black and white pictures (using filters to capture the red, green, and blue values of a scene) and then use the computer to combine them into a single RGB image. A more elaborate version of this process is commonly used in high-end digital cameras used by large photo studios, so I saw no reason why it wouldn’t also work with the Game Boy Camera. [*note: three-pass digital cameras aren’t really used as often now in 2007 but they were at the time I wrote this]
The Process
I picked a location in my apartment where I could make sure the Game Boy could sit absolutely still (so I could take three identically-posed pictures) and picked a small colorful object to photograph. One of the first objects I tried photographing was a Snapple bottle, Kiwi-Strawberry flavored, with a colorful green and pink label.
To capture only the red light reflecting off the Snapple bottle, I was going to need a red filter that I could place in front of the Game Boy Camera, so that only red light would reach the lens. I went to a local photo-supply store and obtained a free book of filter samples, containing dozens of various colored filters. I picked a red filter and held it in front of the lens and took a picture. I repeated the process with a green filter, and then a blue filter, careful not to move the camera or the bottle in between shots.
Using the Game Boy Camera PC Link from Mad Catz, Inc., [no longer available in 2007] I transferred the images to my computer, where I ended up with these three images:
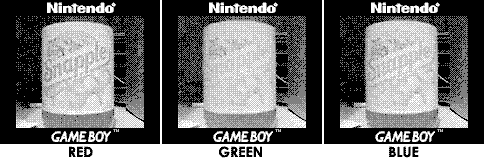
I thought I had done everything right, but when I pulled the images into Photoshop to create my RGB composite from these three images, I came up with a picture that looked like this:

Problems
Obviously, I didn’t have the full color photograph I had anticipated, although there was a hint of color in the image. If my theory was correct, though, it should have worked. A little bit of research on the internet brought me to the cause of the problem. It turns out, the light-sensitive chip inside the Game Boy Camera (it’s called a Mitsubishi M64282FP chip) is sensitive to infrared light, which isn’t visible to the human eye. While I was succesfully filtering out red, green, and blue light, infrared light was still reaching the lens of the camera.
This was easily provable by pointing my Game Boy Camera at my TV remote control and pushing a button on the remote. Even though nothing seemed to happen that I could see with my eyes, I could see the front of the remote light up on the Game Boy screen! I would have to filter out the infrared light reaching the Game Boy Camera in order to get my full color photograph.
Solutions
Apparantly, most digital cameras are sensitive to infrared light, but contain a built in “hot mirror” filter, which blocks infrared (something I learned through a little research on-line). So I went to my local camera shop and bought a hot mirror filter (which was more expensive than I thought it would be, but I was now determined to take color photos with my Game Boy Camera, so I bought it anyway). I held it in front of the Game Boy Camera and repeated the remote control test, and could no longer see the light of the remote light up. I had a good feeling about this. I attached the hot mirror filter to the front of the Game Boy Camera using masking tape, and picked a new test subject to photograph: a Garfield Pez Dispenser.
Repeating the three-pass process of photographing an object with the red, green, and blue filters, I came up with these images:
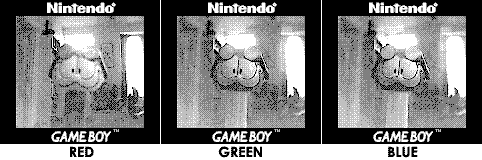
Already I had a good feeling, as these images were more in line with what I was expecting than with the previous tests. So I again transferred them to Photoshop, created a composite RGB image, and this was the result:
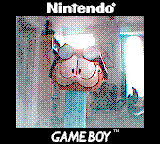
The World’s First color photograph taken with the Game Boy Camera!
More Pictures
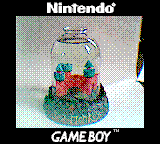
October 31, 2001 - Okay, I know that they are not the most exciting subjects, but the following photos (plus the Pez Dispenser above) are the World’s First color photos taken with the Game Boy Camera. I just shot whatever was around to be used as test subjects.

November 10, 2001 - My first outdoor attempts. First off, notice the vignetting in these images (the halo that seems to be around the pictures). This is caused by the camera itself reflecting in the Hot Mirror filter. I’ll have to use a black magic marker or something to make the GB Camera black so it doesn’t reflect (I think it wasn’t a problem indoors because the camera didn’t have such bright light on it). In the picture of the trees, the blue sky came out nicely peeking through the top. I’ll have to solve the halo problem before my next attempts.


[That’s it. I never got the motivation to shoot any others in this series, as cheap color digital cameras became more prevalent, and the novelty of taking low quality color pictures with a cheap handheld device wore off].

Comments
Classic!
Posted by: Chris | September 17, 2007 8:07 PM
Ha, I saw this years back but never realised that it was you. It’s a small internet, huh? Great work.
Posted by: nickf | September 18, 2007 2:31 AM
>>Ha, I saw this years back but never realised that it was you.
ha- same thing here
Posted by: Anonymous | September 18, 2007 2:45 AM
Nice article! Even though it’s redundant now (obviously) it’s still a great read! I wonder how the shades of your filters would have altered the colour reproduction in the final image.
Posted by: JohnnyW | September 18, 2007 4:06 PM
This process reminds me of the one used here. Color photos in early 20th century Russia:
http://www.loc.gov/exhibits/empire/making.html
Posted by: stephenb | September 19, 2007 6:28 PM
very, very cool. it’s amazing what you can squeeze out of older technology.
Posted by: johnsadowski | September 29, 2007 12:33 PM
very nice, i plan to do this sort of thing next semester. next step: USE 6 COLOR SEPERATION!!! it is pretty hard without a tripod though isnt it XD
Posted by: Anonymous | November 29, 2007 10:07 PM
Cool.
Posted by: Ramco | December 29, 2007 8:51 PM
this is great.
but i don’t understand your process on photoshop. can you explain me by mail please ?
thank you very much.
Posted by: dim | March 1, 2008 7:10 AM
Awesome effort man.
Too bad you had to buy the IR filter.
Is there an easy way to filter out IR. Maybe some type of plastic or polyhtene from bags or whatever ?
Or what about using a mirror ?
I presume the mirror only reflects visible light, so U get filtering without the filter.
I had the opposite problem.
I wanted to take IR pictures and wanted to filter out visible light..
There is an easy solution for that - just use the black round magnetic disk part of an old floppy disc.(I had loads or wasted floppy disks)
Hope you find something similar for your project.
And do check out the IR gesture tracking. Just Google for it.
It’s simply awesome and I’m gonna try it as soon as I can afford to get a USB camera ….
Funda the Idea Monkey
Posted by: Idea Monkey | April 23, 2009 3:00 AM
I remember this from 2001 - it was the second-coolest thing on the internet about the Game Boy Camera (the coolest was a page in which the photographer had tied one to a balloon and taken aerial photographs). The reason I’m looking at it now is that I’ve just bought one of the old, infra-red sensitive digital cameras mentioned in the text, and I wondered if there was a cheaper way of blocking infra-red without using a hot mirror filter (they cost about £50 or so for a 52mm filter). Judging by this writeup, there isn’t. Bum. The DCS isn’t as sensitive to IR as the Game Boy Camera, but the images tend to have an odd colour cast that no amount of Photoshop wizardry can totally eliminate.
Posted by: Ashley Pomeroy | April 26, 2009 7:19 AM
I love this idea, I think I read it a while back, this is bookmarked and I’m gonna try this tomorrow.
Posted by: U-Bit | November 27, 2009 4:36 PM
Thanks for the inspiration… I’ve recently been interested in purposing my gb camera in a robotics application and the idea of using optical filters to increase the utility of such a device is brilliant. My only question is: where might I find a set of these RGB optical filters as samples, as you did?
Posted by: Jon | May 24, 2010 10:57 AM
This is really an epic story, I’m inspired to go and do something completely superfluous with outstanding results!
Also, this reminds me of the pictobox/deluxe pictobox from LoZ Wind Waker.
Posted by: Tidewater | October 24, 2010 7:47 PM
I’m so glad I found this site as it inspired me to have a go at making some colour/color images myself with the GB Camera.
I did some further research on this including IR blocking filters and was about to take apart an old webcam for the lense filter when I decided to take photos without it. I used some red, green and blue sweet wrappers to take the pictures and then created a composite image from that using a program called ‘ImageJ’ which is free to download.
I was so sure that it wouldn’t work but it did! I’ve not tried to take any photos outdoors yet so I guess I need to use an IR block filter for that.
Posted by: sumo73 | January 14, 2011 5:52 PM
thiis methode proves for once and for all that it will work with b&w camera,s so i was wonder if it will also work in b&w nightshot modes.
so i tryed my phone camera with 3 color filtrs one after another on the lens and captured 3 foto,s from different color pens,and i also dit alternately put 3 color filters on the lcd screen to see what i was actualy capturing
note: i used a ir light next to it to only capture ir light at mid-night.
it proves that each color still shows their own grayscales,so therefore it should be theoritically also possible with b&w nightvision,but has someone ever attempted to try this?
it would be sooo cool to see color in the dark,
Posted by: johnson | March 6, 2012 8:14 AM